Rey’s Lightsaber
Armed with all the lessons learned during the first two 3D printed projects, it’s now time to see if I can up my lightsaber game! I really want to make the main character lightsabers from the new trilogy – they have some interesting features/mechanics that set them apart from the originals – so I decided to start with Rey’s lightsaber from Rise of Skywalker. It’s a little simpler detail-wise than Kylo Ren’s, and I still haven’t decided if I want to make that one with printed exposed wires/bits (such fun to sand!) or add my own later. I took care of printing all the parts while working on other things, so by the time I was ready for this project that part was all done.
I still hadn’t quite found the sweet spot for print sanding yet, so this time I was way more aggressive and started with a 100 grit dry. Even with the low grit it still took a decent amount of effort to remove material, so I think I was definitely being way too cautious with my earlier attempts. This first pass really knocked down most of the layer lines, so I only did one more pass (wet this time) with some 220 and then dry-fitted all the parts to make sure everything would work. Spot putty was applied much more liberally this time; I’m finding that the surfaces touching the print bed – although the plastic bonds well – just always manage to show layer lines, even with the extra sanding. I put a thin coat of the spot putty over almost all of those surfaces that would be exposed, used it to also repair a few minor print issues, and then sanded and applied a good coat of primer. After priming there were still some spots showing layers, so I did another round of spot putty and some light sanding – I didn’t re-prime however, which turned out to be a bit of a mistake!
Before starting any painting I assembled most of the parts using CA glue, leaving the “top” emitter parts more or less separate to make paint spraying easier. I did quickly brush on some black acrylic in the areas that would be more difficult to spray (deeper grooves, inside of cut-out holes, etc.) just to make sure those spots would definitely be covered with a dark colour. With more airbrush experience I think you could get all those spots with very little difficulty, but I’m not quite that confident in my skills yet. This lightsaber is a uniform colour all over, and in photos it’s sort of a dark brown-grey / charcoal metal so I mixed some lamp black acrylic with a little raw umber both to lighten it and hopefully add an appropriate tint. I used graphite powder for a metallic look on my Han Solo blaster but I didn’t want this lightsaber to look almost exactly the same, so this time I tried just adding a small amount of bright silver to the paint mix. My thought/hope was that when mixed in it would give the paint just enough reflectiveness in the light to seem like metal. This actually worked reasonably well and you do get the metallic look, but the silver didn’t lighten the black as much as I thought it would so I think it could have used a little bit of light grey in with the umber. This is also where I noticed my priming mistake; after airbrushing on a couple coats of the paint you could still see faint scratches from the sanding, which would have all been nicely filled with a second coat of primer. In this case it wasn’t the worst though, and I figure that many of the parts on this thing are supposed to be worn and scratched from years in a desert anyway – covering up mistakes with back story! A good layer of gloss clear sealed everything in, and it was finally time to assemble everything before moving on to weathering and finishing the grip.
I’d like to mention a few things about the assembly and some of the features this 3D model offers, so that anyone else interested in this lightsaber can maybe make some decisions up front. The idea with this print is that you can extend/retract the blade emitter by turning the “knob” ring just above the grip; you can probably get a better idea by looking at the parts, but basically it just pushes up the center part inside the emitter, which then pushes on the closed teeth to swing them open. It’s a nice simple design to add a neat interactive feature, but there are a few caveats:
1. The entire top emitter assembly is only secured to the rest of the hilt with a small glued connector peg on one side – this makes for a somewhat fragile prop overall, and since the other side has no support you do sometimes get a little extra friction when turning the knob.
2. The upper rotator part (piece that moves up and down inside the emitter) is kept in place by sliding in a single small groove, but you have to paint/seal most of the surfaces that will touch each other since they will be visible and this really adds a lot of friction to the sliding parts. It also needs to sit straight all the time to slide up and down properly, which doesn’t seem to work consistently with this design.
3. It’s very difficult to make the teeth open and close smoothly, they’re very delicate and a lot of sanding is required – make sure to not paint any of the tooth attachment points! This is really more a statement on the difficulties of finishing small printed parts rather than any issues with the design.
I do like the ability to open and close the emitter, it’s one of the reasons I chose this particular model. I built this as a purely display prop so I really don’t mind the movement issues, everything does still technically work so it can be displayed either closed or open. If you’re looking for something that will get a lot of use I don’t think this will work for you; the fragile attachment point and difficulty getting smooth action might not make it the best option.
Weathering for this lightsaber mostly consisted of adding bright silver to any edges for a worn metal look. The assumption I’m making here, and one I make for most “in-use” weapons/tools, is that while the item would get scuffed up the owner would most likely not let it get TOO caked with dirt and grime before cleaning since they would probably want it to work reliably when needed! I added a very light pass of both raw and burnt sienna in some of the indentations and corners to give subtle hints of dirt/sand that might accumulate there between cleanings. A couple of light coats of matte clear spray sealed all that in – I went with the matte for the final finish because the gloss I used previously felt too glossy for the look I wanted. This matte spray still has a slight gloss when dry, so it ends up being my preference most of the time. This second clear coat ended up filling in most of the visible sanding scratches seen above, so I lucked into that small mistake fixing itself.
Finally it was time for the grip! This lightsaber didn’t get a lot of screen time in the movie, but from the stills I pulled (and a bunch of fan interpretations I found online) the grip seems to be covered with a worn scrap of cloth with a wrap of some type of leather on top. I looked at several different options for the cloth and ended up using a piece of cheesecloth I had lying around; the texture, colour and tattered edges gave a look I was happy with, and since it had been previously used to strain various things (don’t worry, it was washed!) it was also pre-weathered with some patchy discolouration that I really liked. For the leather wrap I considered using a strip of 2mm EVA foam and painting it to look like leather, but I’ve never painted that look before and didn’t want to mess up the prop at this stage so I ended up just ordering an inexpensive strip of actual leather. A note for next time though: Make sure to double check that the thickness of the leather will work with what you’re wrapping! The strip I ordered turned out to be a little too thick to wrap nicely around the grip, so since I don’t have any leatherworking tools to do this properly I used my Dremel with a rough sanding drum to remove a lot of the leather from the unfinished side. It was very messy, but worked great in the end! I attached both the cloth pieces and the leather wrap with hot glue, and added a drop of CA glue at both ends of the leather wrap to keep it from pulling up.
The very last step was some weathering on the wrap. I lightly scuffed the leather here and there with some sandpaper, and then used a watered down mix of black and raw umber acrylic to darken the exposed leather edges and the grooves created by the wrapping. It definitely helped give the look of dirt accumulating in the low grooves, as well as making the raised edges lighter where they might be worn. I also lightly dry-brushed this colour mix all over the leather to make the work look a little less even. With that, I’m considering this lightsaber complete! This build had a lot of tricky sanding, but I see definite improvement even over the blaster I did before this. I think I’m finally happy with the finish I’m getting on the 3D print parts, but I have come across some other methods that I’d like to try that might reduce the amount of sanding needed – that will have to wait for the next time though!

Sanded and ready for putty 
Extra putty on certain surfaces 
Primed, sanded, ready for paint 
Filling in hard to reach spots 
Painted and sealed with gloss 
You can still see the sanding scratches a little 
Open emitter 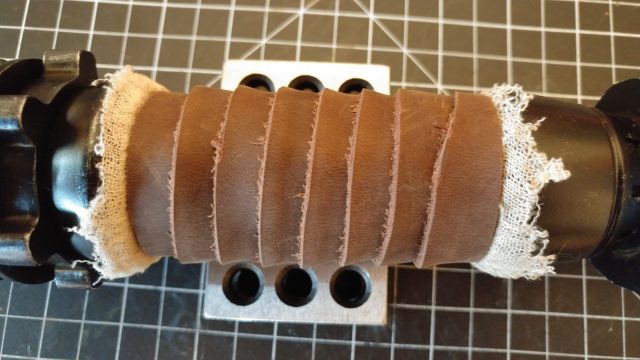
Un-weather leather wrap 
Leather wrap after weathering 
All done, I’m very happy with this one!
